10 tips to clean your piercing now
1. Wash Your Hands Before Touching Your Piercing

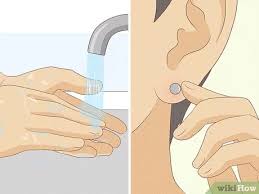
The first and most important rule of piercing care is always to wash your hands thoroughly before touching your piercing. Your hands carry bacteria and oils that can easily infect a new piercing. Use a gentle, fragrance-free soap and wash for at least 20 seconds. This simple precaution can prevent most common piercing infections.
2. Use Saline Solution for Cleaning

One of the gentlest and most effective ways to clean your piercing is by using a saline solution. You can either buy a pre-made saline solution from a pharmacy or make your own by mixing 1/4 teaspoon of sea salt in 1 cup of warm, distilled water. Apply the saline solution with a clean cotton ball or gauze pad to gently clean the area around the piercing.
3. Avoid Using Harsh Chemicals or Alcohol

While it may be tempting to use alcohol, hydrogen peroxide, or antiseptic solutions to clean your piercing, these can be too harsh. They dry out the skin, slow the healing process, and may even cause scarring. Stick to saline solution or other products recommended by your piercer to avoid irritating the piercing.
4. Clean Twice a Day, Not More

Over-cleaning a piercing can be just as harmful as not cleaning it at all. Cleaning your piercing twice a day is enough—once in the morning and once before bed. Too much cleaning can disrupt the natural healing process, drying out the skin and causing irritation. Follow your piercing professional’s advice on how frequently to clean your particular piercing.
5. Use a Cotton Swab or Gauze, Not Cotton Balls

When cleaning around your piercing, opt for a cotton swab or a piece of gauze rather than a cotton ball. Cotton balls tend to leave behind fibers that can get stuck in the piercing, leading to irritation or infection. A cotton swab can help you get into the crevices of the piercing and clean it without leaving any residue behind.
6. Let the Piercing Air Dry

After cleaning your piercing, avoid wiping it dry with towels or tissues, which can carry bacteria. Instead, allow the piercing to air dry naturally. You can gently pat the area with a clean paper towel if necessary, but don’t rub or use anything abrasive on the piercing.
7. Avoid Removing the Jewelry During Healing

One of the worst mistakes you can make while cleaning a fresh piercing is removing the jewelry before the piercing has fully healed. The hole may close up quickly, trapping bacteria inside, leading to infection. Keep your jewelry in place during the healing process unless a professional piercer advises you to remove it.
8. Shower Instead of Soaking

When cleaning a piercing, you may want to avoid submerging it in water, especially during the initial healing phase. Swimming pools, hot tubs, and even bathtubs can harbor bacteria that can infect your piercing. It’s best to take showers instead of baths and clean the area under running water to avoid unnecessary risk.
9. Avoid Touching Your Piercing With Dirty Hands

Even if you just cleaned your piercing, touching it with dirty hands can introduce bacteria and cause an infection. Make sure that you only touch your piercing after washing your hands thoroughly. Also, avoid playing with the jewelry, as this can irritate the skin and prolong the healing time.
10. Watch for Signs of Infection and Seek Professional Help If Needed

While cleaning is crucial, it’s equally important to pay attention to any signs of infection. Redness, swelling, excessive pain, or unusual discharge (especially if it’s green or yellow) can indicate an infection. If you notice any of these symptoms, contact a professional piercer or healthcare provider immediately for advice.
Conclusion: Patience Is Key
The best trick to ensure your piercing heals properly is patience. Piercings can take anywhere from a few weeks to several months to fully heal, depending on the location and type of piercing. By cleaning your piercing properly, avoiding harsh chemicals, and taking the time to care for it, you can reduce the risk of complications and enjoy your new piercing for years to come!
Bonus Tip: Stay Consistent
Healing takes time, and consistency in care is essential. Set reminders to clean your piercing twice a day and follow all aftercare instructions provided by your piercer. With proper care and attention, you’ll be able to enjoy a healthy, beautifully healed piercing.
By following these 10 simple but essential tricks, you can ensure that your piercing heals safely, and avoid common mistakes that can cause infection or delays in the healing process. Good luck and enjoy your piercing!

A stye (or sty) is a painful red bump on the edge of your eyelid. It can look similar to an acne pimple and may be tender to the touch. A stye forms when a tiny oil-producing gland in your eyelash follicle or eyelid skin becomes blocked and a bacterial infection develops. The medical term for a stye is “hordeolum.”
It’s common to have a stye on only one eyelid, but it’s also possible to get styes on both lids. A stye usually lasts one to two weeks and will typically go away on its own. But in cases where it doesn’t, you may need to rely on an eye care provider to drain it. They may also prescribe antibiotics to reduce the infection.
A stye is similar to another eyelid bump called a chalazion. A chalazion is a bump that usually occurs farther back on your eyelid. Unlike a stye, a chalazion usually isn’t painful and isn’t caused by a bacterial infection. But treatment for both conditions is similar.
Types of styes
There are two types of styes:
- External styes: External styes form on the outer part of either your upper or lower eyelid. They’re the more common type. An infection in your eyelash follicle usually causes them.
- Internal styes: Internal styes form on either of your inner eyelids (facing your eyeball). An infection in the inner eyelid gland that produces oils that help keep your eyelid moist causes this type.
How common are styes?
Styes are very common. They’re more common in adults than children because the oil in an adult’s oil glands is thicker than a child’s. That means it’s more prone to blockage.
Symptoms and Causes
https://imasdk.googleapis.com/js/core/bridge3.688.0_en.html#fid=goog_2057699247Is That Bump on Your Eye a Stye or a Chalazion?
What are the symptoms of a stye?
The main symptom of a stye is a painful red bump along your eyelid edge near your eyelashes. Other stye symptoms may include:
- Swelling of your eyelid (sometimes your entire eyelid).
- Discharge from your eye.
- Crusting along your eyelid.
- Light sensitivity.
- Soreness and itching.
- Eye tearing.
- A scratchy feeling or a feeling that there’s something in your eye.
What causes a stye?
A bacterial infection in your eyelid’s oil-producing glands causes most styes. The oil-producing glands line the eyelids and help lubricate the surface of your eye.
Are styes contagious?
Styes generally aren’t contagious. But small amounts of bacteria can be spread from them. This is why it’s important to always wash your hands before and after touching a stye and wash pillowcases often to help prevent the bacteria from spreading. Unless you’re cleaning or applying warm compresses to the stye, avoid touching it to reduce bacteria spread and irritation.
What are the risk factors for developing a stye?
Styes are very common, and anyone can get them. But you may be more likely to get a stye if you:
- Have had a stye before.
- Have blepharitis (an inflammation of your eyelids).
- Have certain skin conditions, like acne, rosacea or dandruff (seborrheic dermatitis).
- Have diabetes.
- Have dry skin.
- Are experiencing hormonal changes.
- Have high lipid levels (“bad” cholesterol).
Diagnosis and Tests
How is a stye diagnosed?
Some styes are more stubborn and require a visit to a healthcare provider. If your vision seems to be affected or if your stye seems to be getting worse instead of better, contact a provider.
During your appointment, your provider will examine your eyelid and ask about any additional symptoms you’re having. They’ll be able to diagnose a stye based on this eye exam.


